AC Electrical, Boot stripe, Rudder repair
We're working hard! We are determined to get Zora launched and move aboard in June. Things are getting done....... she still looks like a construction zone but we can see that we're making progress.
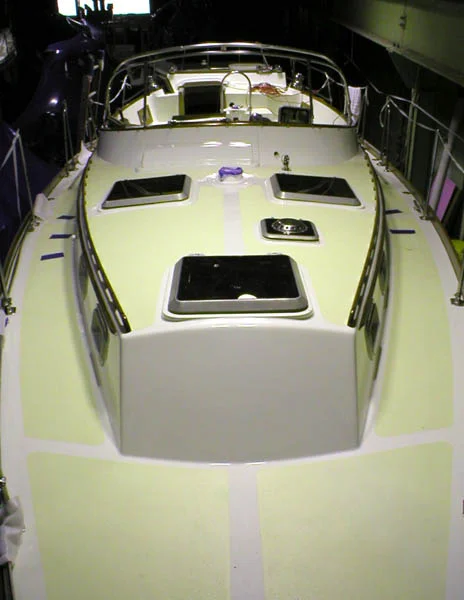
When we were moved back inside, we totally washed down the decks for the first time since they were painted last summer. How pretty!!!!!!
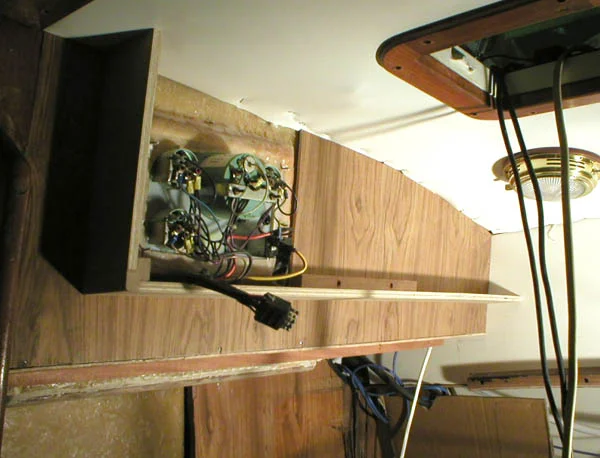
We're hoping that all of the interior carpentry will be finished by the end of the first week in May. Then Neil will start working on the spars and rigging, and I, in relative cleanliness, will get to work varnishing the interior. To that end, we're concentrating on interior projects. Neil's building the enclosure for the 120 volt (A.C.) panel, LPG panel, and engine controls, and the A.C. system will be in place within the week. Here's the beginning:
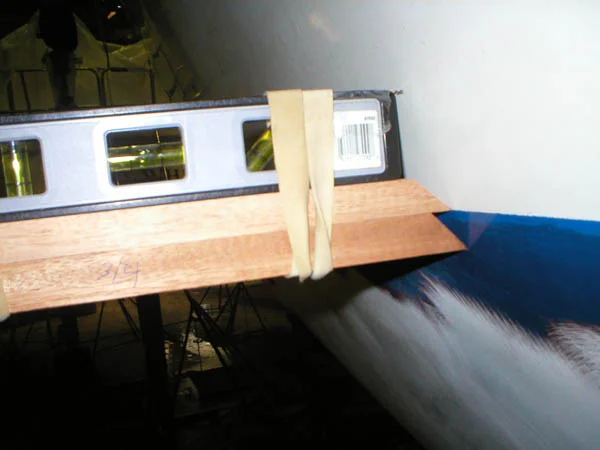
We've also made some good steps towards fun "finish" projects: the bottom is totally sanded smooth and white, the barrier coat (Interlux "Interprotect") is ordered; the bottom paint (Trinidad SR in green) is ordered; the boot stripe paint is bought (Brightside in Flag Blue). The April issue of Cruising World magazine had some very timely articles for us, including one on marking and painting boot stripes. We used their idea for making a marking system, and it worked well! We're raising our waterline several inches: it had already been raised a few inches so, in all, it's about 6.5" higher that the "designed" water line. It isn't as pretty, since it wraps the transom, but it will allow for all of our cruising gear, hopefully. So we used the top of the existing boot stripe as our constant, and measured up and down from there for our new stripes. The boot stripe is not a constant width on the hull, it is much wider at the bow and especially the stern to compensate for the large change in hull angle there (although visually it appears the same width when you look at the boat from normal viewing distance). So we made a tool out of a torpedo level, some wood cut to the correct thickness, and rubber bands. After leveling the boat on her stands, I painstakingly went around the boat marking the hull every 6" or so. The leading edge of the middle piece of wood is placed on the existing stripe. I taped a pointed splinter of wood onto the top edge of the level to show where to mark the top edge of the new boot stripe. The leading edge of the bottom piece marks the new waterline. As you go around the hull and the angle changes, you slide the pieces till they touch the hull when the torpedo level is leveled. Next step is taping!
Meanwhile I've set up my sewing table and am awaiting the delivery of the foam and zippers: next week I start sewing cushions!!!
I want to take a minute to thank a few folks who've been so generous in the last couple of weeks. Mike Faulkingham has kindly loaned us his great inflatable dinghy and outboard for our trip: that is such a huge help! And, at the Sabre owners' "yard sale" last weekend, Bob and Suzy Martin gave us a new fresh water pump (with spares!), boat hook, and chart holder. Thanks so much! A very nice person who saw our web site has offered to build our cockpit grates for us, since he's recently built some for his own boat, thanks so much Stan Murphy!!!!! We've also gotten some help recently from the incredibly nice folks at Sabre Yachts. I had been looking for small, sturdy puch-button latches and saw that they use just the ones I wanted. I emailed them and they offered to sell me some. I even got a tour of the factory and hands-on advice from the builders. Lyman Morse boatbuilders have also helped us out by supplying the refrigerator gasket we need: thanks guys! It's really great how open and helpful the boatbuilding community is, especially here in Maine.
Also started painting our boot and cove stripes; reckoning with fish-eye problems. Even after careful prepping with degreaser, acetone, denatured alcohol, the "correct" Interlux thinner, and Awlprep, still some fisheye problems. We'll have to fill and fair between coats. Just another one of those projects that was supposed to take couple of hours but ends up taking a week!!!
Neil's started his vacation! The last vacation he'll ever take from his job.... he's got two weeks to work at the boat day and night. Already the interior is coming together quickly: the cabinet over the stove is nearly finished and he'll start on the dish cabinet tomorrow. He's hoping to have all of the interior cabinetry finished, trimmed and bunged (with the exception of hanging the doors, which our friend Dave is making for us), and the sole repaired, by the end of these two weeks. That will mean that I can clean the heck out of the boat and start varnishing the interior while Neil works on the spars. We're still hoping to launch in June, although of course we keep losing time: we're already a week behind because Neil got sent to Texas last week and had to postpone his vacation: argh!
We have made some huge decisions recently, things that have been hanging over my head for 2 years! The liferaft..... we've ordered a self-righting Viking RescYou Pro. It was fully $600 more than our other choices, but we just felt more comfortable with it. Of course, we'll probably -hopefully!!- never use it so it'll be a non-issue, but I do feel better knowing we have a good raft. It's not the super top-of-the-line SOLAS $7000 deluxe, but, hopefully, a robust raft with adequate supplies. We like the self-righting feature (it'll flip upright if it deploys upside down) and it has two big access doors, and inflatable floor, double arches, and other good stuff. It also has a lovely canister (Danish design, what do you expect?) which is nice since it's a BIG thing to have on the aft cabin top.